

How To Create Virtual Environment In Anaconda
1. A little bit about Conda and its related terms 📖
Before we dive into learning commands for managing virtual environments, it may be helpful to familiarise with a few common terms regarding Conda.
📍 1.1. Conda vs Miniconda vs Anaconda
Conda is a language-agnostic tool for package management and environment management. As a package manager, Conda can install, update and remove packages. As an environment manager, it can manage virtual environments.
Anaconda is the most popular Python distribution (i.e way of distributing Python to end users like you and me). By installing Anaconda, you get Miniconda, Anaconda Navigator (i.e. a graphical user interface) and curated selection of packages installed.
Miniconda is a mini-scale version of Anaconda. It is also a Python distribution. By installing Miniconda, you get Conda, Python and a small number of packages installed.
As we can see, Conda is included in both Anaconda and Miniconda.
📍 1.2. Conda vs Pip vs Venv
Pip is a package manager for Python.
This means both C o nda and Pip can be used to install, update and remove packages in Python. While Pip gives access to a wider range of packages available on the Python Package Index (PyPI), Conda gives access to a relatively smaller range of packages available on its channels. As a result, there are times where a certain package will only be available for installation via Pip.
Venv is an environment manager for Python.
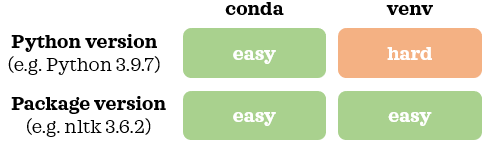
Both Conda and Venv are great at managing virtual environments (i.e. isolated and independent environments) with different versions of packages. However, one obvious benefit of Conda over Venv is its ease of managing multiple Python versions. In other words, Conda makes it seamless to create virtual environments using different versions of Python. With Venv, we will need to use an additional tool to manage Python versions or install multiple Python versions before creating virtual environments.
2. Virtual environments with Conda 💻
Now, let's learn the basics of managing virtual environments with Conda. I encourage you to follow along on your computer as you read to get hands-on experience.
📍 2.1. Getting ready
If you are following along with the commands in the section, ensure your computer has Conda (version 4.6+) installed either via Anaconda or Miniconda.
We can access Conda via Anaconda Prompt on Windows and Terminal on Mac. Let's start by opening up the relevant command-line interface for your operating system with the following instructions:
Windows: Press windows key ➡️ Type Anaconda prompt ➡️ Press enter
Mac: Press cmd + space bar ➡️ Type Terminal ➡️ Press enter
Now, it's time to create virtual environments!
📍 2.2. Creating virtual environments
First, let's check out the list of existing virtual environments:
          $ conda env list # Option 1
$ conda info --envs # Option 2 
We have one virtual environment called base. When we install Miniconda or Anaconda, it creates a default environment called base. This is what we are seeing in the output.
We will now learn three common ways of creating a virtual environment.
📍 2.2.A. Creating a virtual environment from a YAML file
A common way to create a virtual environment is to create it from a YAML file: environment.yml or environment.yaml. This file contains specifications of the virtual environment (e.g. name of environment, packages, their versions and Python version). You can see some example YAML files from here and here. If we had such YAML file in the current working directory, we can create a virtual environment from it with one of the commands below:
          $ conda env create -f environment.yml # Short form
$ conda env create --file environment.yml # Long form
Now, let's check out the list of virtual environments again:
$ conda env list 
We now have a new Conda environment called test. The environment that has asterisk indicates the active environment we are in. This means we are still in the base environment. Let's activate the new environment and check the list of virtual environments again:
          $ conda activate test
$ conda env list 
We can see the asterisk next to the new virtual environment: test. We can also see the active environment name in () at the beginning of the command line as shown in the top left of the screenshot above.
📍 2.2.B. Creating a virtual environment by cloning
Another way to create virtual environment is to clone an existing environment. With the following command, we clone an environment called test and name the clone as testclone:
          $ conda create -n testclone --clone test # Short form
$ conda create --name testclone --clone test # Long form
Once the environment is created, we can activate the newly created environment like before.
📍 2.2.C. Building a virtual environment with commands
Sometimes we need to build the environment ourselves. Let's create an environment using Python version 3.9.7 and call it anothertest:
$ conda create -n anothertest python=3.9.7 When prompted, type y and press enter to continue the creation. If we don't want to be prompted, we can add -y in the command:
$ conda create -n anothertest python=3.9.7 -y Let's activate the environment and check the Python version:
          $ conda activate anothertest
$ python --version 
We can confirm that the new environment uses Python 3.9.7. When creating Conda environments, we can go up and down Python version. For instance, if my base Python is 3.7.1, I can create an environment with Python 3.5.3 or 3.9.7. If we didn't specify a Python version: conda create -n anothertest -y, the new environment will use the same Python version as the base Python.
Installing packages one at time can lead to dependency conflicts. Conda's official documentation recommends to install all packages at the same time so that the dependency conflicts are resolved. Hence, we will now install multiple packages at once instead of installing one by one. Here's an example:
$ conda install "numpy>=1.11" nltk==3.6.2 jupyter -y Here are different ways we could specify a version when installing packages:

If we don't specify the version of the packages: conda install numpy nltk jupyter -y, Conda will install the latest version of these packages.
📍 2.3. Conda channels
By default, conda install will install packages from its defaults channel. There are times where a certain package is not available on this channel but may be available on other Conda channels such as conda-forge, a popular channel that is maintained by the community. We can check the current channels using the command below:
$ conda config --show channels 
To add conda-forge channel and check the current channels again:
          $ conda config --add channels conda-forge
$ conda config --show channels 
We can see an additional channel: conda-forge. The order in which these channels are displayed shows the channel priority. In this example, conda-forge is the high priority channel. This means when we run conda install package_name, Conda will try to install a package from conda-forge channel and if it's not available in conda-forge, it will try to install a package from the defaults channel. This change in channels is not specific to an environment, instead it impacts how Conda is configured in general. If you want to remove a conda-forge channel, you can use the command below:
$ conda config --remove channels conda-forge If we don't want to add a channel, but still want to install package that is available in another channel but not in the defaults channel, here's an alternative command we can use to install package from other channels:
          $ conda install package_name -c conda-forge -y # Short form
$ conda install package_name --channel conda-forge -y # Long form
This will not change the channels configuration but will install the package from the desired channel (e.g. conda-forge in this example) for the occasion.
If a package is not available across Conda channels, you can install the package from Pip in the active environment using pip install command:
$ pip install package_name Now it's time to learn a few other useful commands to manage virtual environments.
📍 2.4. Deactivating virtual environments
Once you are done using the virtual environment, if you want to switch back to the base environment, you can use one of the following to deactivate the environment:
          $ conda activate # Option 1
$ conda deactivate test # Option 2
📍 2.5. Exporting environment specifications to YAML file
We can check the specifications of the current environment with:
$ conda list This will show environment details such as Python version used, package names installed and their versions. To export the specifications of the current environment into a YAML file into the current directory, we can use one of the commands below:
          $ conda env export > environment.yml # Option 1
$ conda env export -f environment.yml # Option 2
📍 2.6. Removing virtual environment
Let's now remove all the test environments we created as part of this tutorial:
          $ conda activate # Need to deactivate the environment first
$ conda env remove -n test
$ conda env remove -n testclone
$ conda env remove -n anothertest
$ conda env list
If you are on Windows, I also recommend to delete the environment folders as well. If you are not sure where to find these folders, conda env list will show the location. For instance, the folders were in this location on my computer:
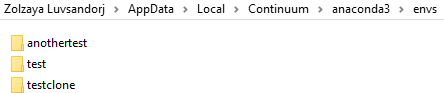
After deleting this, all the test environments will be deleted completely. Now it's your turn to create a virtual environment for your project!
How To Create Virtual Environment In Anaconda
Source: https://towardsdatascience.com/introduction-to-conda-virtual-environments-eaea4ac84e28
Posted by: ruckersoetted.blogspot.com
0 Response to "How To Create Virtual Environment In Anaconda"
Post a Comment